
Deploying Containerized Applications on GCP Cloud Run
Here is a quick run-through on how to deploy a containerized application on GCP's Cloud Run. I'll aim to provide an overview on Cloud Run and why I chose this service for running my application, as well as various configurations and deployment steps to get you up and running in production!
What is Cloud Run?
Google Cloud provides many services to deploy an application:
- Compute Engine: A competitor to Amazon EC2 which allows you to run Virtual Machines on Google Infra.
- Kubernetes Engine: A platform that manages containerized applications. GCP offers Autopilot clusters and Standard clusters based on your needs.
- Cloud Run: A serverless solution to run stateless containerized applications that is fully managed by GCP.
- Cloud Functions: A platform that manages event-driven functions in a serverless execution environment.
There's many choices to be made when you're at that stage of needing to deploy an application. Compute Engine and Kubernetes Engine gives you a bit more granular control over the entire process, while Cloud Run and Cloud Functions is managed entirely by GCP infrastructure.
Part of the reason for this article, is documenting how I went about deploying my personal website to the cloud.
My priorities were:
- Cost Efficiency
- Rapid / Easy Deployments
- Hands off approach
I essenitally wanted to choose an offering that was inexpensive, extremely easy to deploy and iterate over, and not have to focus much on management. With my web application being stateless while also having a small footprint, I understood that I needed a simple to use offering that would manage my application for me.
When I started looking into what offering I could leverage, I first chose Compute Engine as I was already familiar with the offering and initially open to the idea of running a docker container. VM's are generally very fast to spin up and GCP also has a free tier with 1 non-preemtible e2-micro VM instance per month.
This would be a very cost effective solution, but I would have to go in and redeploy new versions of the application and ensure the VM / container was up and stable. I could leverage a Github Action / Cloud Build Pipeline to handle this, but at the time I didn't want to sink more time into CI / CD.
I then came across Cloud Run which also has a free tier model based on vCPU / Memory usage and seemed to simplify deployment and upkeep. It completely checked off my list of requirements. It was slightly more expensive than a small VM instance using Compute Engine, but also simplified deployment and management.
How do I get started?
First thing you would need to do is to containerize your application. Cloud Run supports Docker images stored in Artifact Registry which seemed like the logical choice for me.
My web application is built using Next.JS which offers a way to build my app in standalone which bundles the application and copies all of its dependencies into a folder. I can then leverage the Node.JS runtime to bring the server up and serve my content.
Here is my Dockerfile which is separated into various build stages with stage prod being the production stage which is used to create the image that will be used by Cloud Run.
FROM node:20-alpine AS base
# ---------------------------------------------------------
# Install dependencies only when needed
FROM base AS deps
# Check https://github.com/nodejs/docker-node/tree/b4117f9333da4138b03a546ec926ef50a31506c3#nodealpine to understand why libc6-compat might be needed
RUN apk add --no-cache libc6-compat
WORKDIR /workspace
# Install dependencies via npm with a clean slate
COPY package.json package-lock.json* ./
RUN npm ci
# ---------------------------------------------------------
# Rebuild the source code only when needed
FROM base AS builder
WORKDIR /workspace
COPY /workspace/node_modules ./node_modules
COPY /workspace/package.json ./package.json
COPY /workspace/package-lock.json ./package-lock.json
COPY . .
ENV NEXT_TELEMETRY_DISABLED 1
ENV NEXT_PUBLIC_SITE_URL https://kavinaravind.com
RUN npm run build
# ---------------------------------------------------------
FROM base AS dev
RUN apk add --update --no-cache alpine-sdk jq bash
WORKDIR /workspace
COPY /workspace/node_modules ./node_modules
COPY /workspace/package.json ./package.json
COPY /workspace/package-lock.json ./package-lock.json
COPY . .
EXPOSE 7725
ENTRYPOINT [ "npm", "run", "dev" ]
# ---------------------------------------------------------
# Production image, copy all the files and run next
FROM base AS prod
RUN apk add --update --no-cache alpine-sdk jq bash
WORKDIR /workspace
ENV NODE_ENV production
ENV NEXT_TELEMETRY_DISABLED 1
RUN addgroup --system --gid 1001 nodejs
RUN adduser --system --uid 1001 nextjs
COPY /workspace/public ./public
# Set the correct permission for prerender cache
RUN mkdir .next
RUN chown nextjs:nodejs .next
COPY /workspace/.next/standalone ./
COPY /workspace/.next/static ./.next/static
USER nextjs
EXPOSE 3000
ENV PORT 3000
ENV HOSTNAME "0.0.0.0"
CMD ["node", "server.js"]
I can then easily leverage the gcloud and docker cli to build / tag / push the image to Google Cloud Artifact Registry.
docker buildx build --platform linux/amd64 -t personal-website:1.0.0 . --target prod
docker tag personal-website:1.0.0 us-central1-docker.pkg.dev/kavin-aravind/kavin-aravind-registry/personal-website:1.0.0

gcloud auth login
gcloud auth configure-docker us-central1-docker.pkg.dev

docker push us-central1-docker.pkg.dev/kavin-aravind/kavin-aravind-registry/personal-website:1.0.0
One thing to note is that my daily driver is an Apple M1 Macbook which is ARM based, and running on Cloud Run requires an X86 container image. You can leverage docker buildx to specify the architecture.
Once you have the image built and deployed, its now time to navigate to the GCP console!
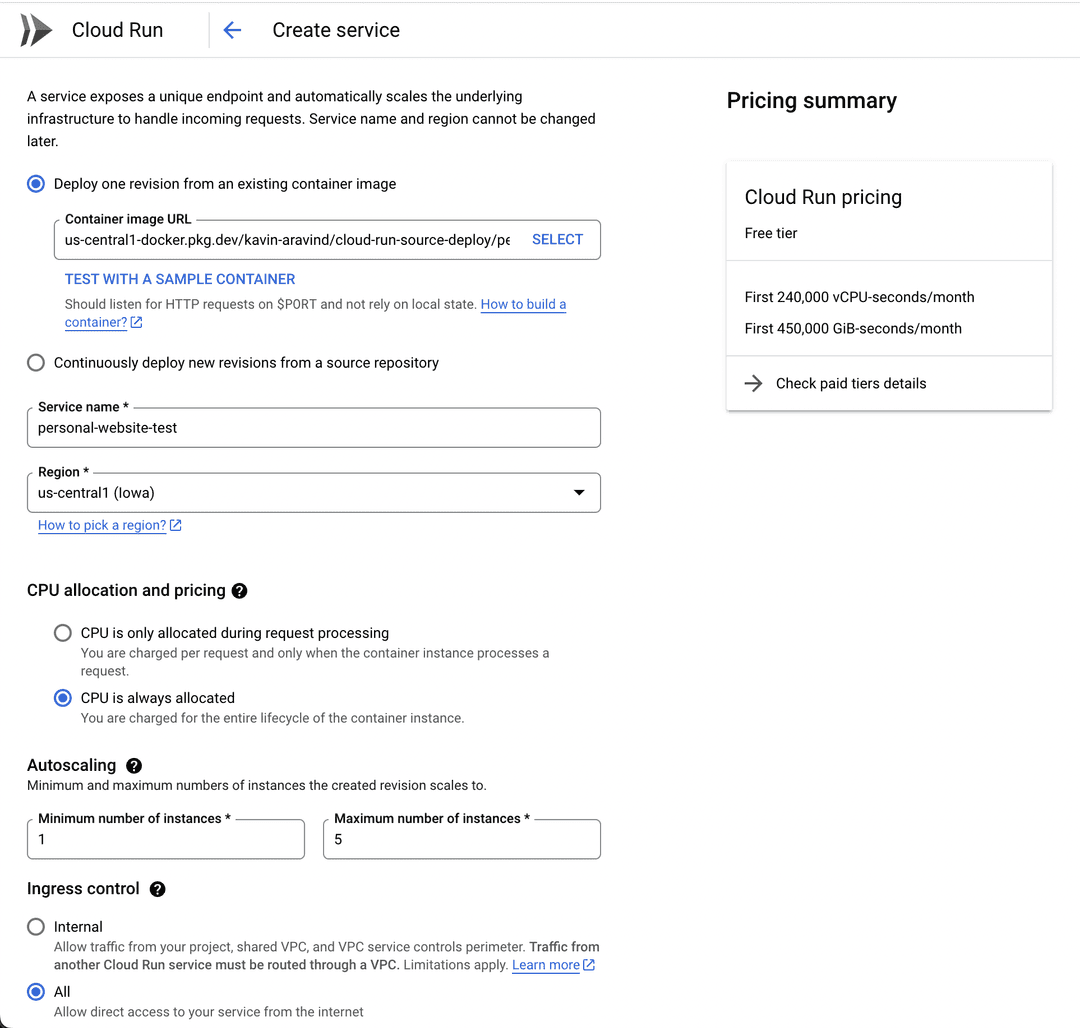
In the example above, I am creating a service where you can easily select the image that was pushed to Artifact Registry, specify your service name, and allocate CPU. I like to always have at least 1 instance running so I selected "CPU is always allocated" with a minimum of 1 instance and a maximum of 5. You can of course cut costs a bit more by only allocating CPU during request processing, but that will come with slight delays on first fetch.

I needed to modify the Container port to 3000 but everything else remained at it's defaults. You can then deploy the service, and Cloud Run will automatically provide a URL with a configured SSL Certificate.
Additional Steps to Make Life Easier
Cloud Run also supports Continuous Deployment via Cloud Build. I later ended up using this to make deployments even easier. Rather than building locally and updating the Cloud Run service to point to the new image, you can easily connect your Github Repository to Cloud Build and enable a trigger to execute a build and deploy to Cloud Run.
Here's an example of a Cloud Build Trigger that will execute whenever there is a push to the master branch:

Here's the configuration file that is used. One thing to note is that you would beed to specify the target as prod under Dockerfile if you were using the Dockerfile mentioned earlier in this article.
steps:
  - name: gcr.io/cloud-builders/docker
    args:
      - build
      - '--no-cache'
      - '-t'
      - >-
        $_AR_HOSTNAME/$PROJECT_ID/cloud-run-source-deploy/$REPO_NAME/$_SERVICE_NAME:$COMMIT_SHA
      - .
      - '-f'
      - Dockerfile
      - '--target=prod'
    id: Build
  - name: gcr.io/cloud-builders/docker
    args:
      - push
      - >-
        $_AR_HOSTNAME/$PROJECT_ID/cloud-run-source-deploy/$REPO_NAME/$_SERVICE_NAME:$COMMIT_SHA
    id: Push
  - name: 'gcr.io/google.com/cloudsdktool/cloud-sdk:slim'
    args:
      - run
      - services
      - update
      - $_SERVICE_NAME
      - '--platform=managed'
      - >-
        --image=$_AR_HOSTNAME/$PROJECT_ID/cloud-run-source-deploy/$REPO_NAME/$_SERVICE_NAME:$COMMIT_SHA
      - >-
        --labels=managed-by=gcp-cloud-build-deploy-cloud-run,commit-sha=$COMMIT_SHA,gcb-build-id=$BUILD_ID,gcb-trigger-id=$_TRIGGER_ID
      - '--region=$_DEPLOY_REGION'
      - '--quiet'
    id: Deploy
    entrypoint: gcloud
images:
  - >-
    $_AR_HOSTNAME/$PROJECT_ID/cloud-run-source-deploy/$REPO_NAME/$_SERVICE_NAME:$COMMIT_SHA
options:
  substitutionOption: ALLOW_LOOSE
  logging: CLOUD_LOGGING_ONLY
substitutions:
  _PLATFORM: managed
  _SERVICE_NAME: personal-website
  _TRIGGER_ID: <id>
  _DEPLOY_REGION: us-central1
  _AR_HOSTNAME: us-central1-docker.pkg.dev
tags:
  - gcp-cloud-build-deploy-cloud-run
  - gcp-cloud-build-deploy-cloud-run-managed
  - personal-website
I also use Cloud DNS with GCP LB's coupled with a static ip address and Cloud NEG's to expose this using my custom domain. Cloud Run also has Domain mappings in Preview which is an extremely simple way to point your domain to this service. I leverage a different flow as I already use Cloud DNS for various CNAME's.

I now have my web application up and running in production! It is fairly cost effective (~$25 a month and could be cheaper if I bumped down compute and didn't use Cloud Build), extremely easy to deploy / update, and self managed by Google Cloud infrastructure.
I hope this helps! Thanks for reading. 😊